概要
AWSでまとまったデータの処理を行う場合,ECSを使うと便利です。自分の考えるメリットは以下の通りです。
- コンテナ化によりアプリの再利用が促進される
- あらかじめリソースを確保する必要がなく,従量課金でデータ処理を実行できる
- Lambdaと違って時間制限がないため,より柔軟に設計できる
ECSだけだとログが追いにくい,他のアプリと連携が取りにくい,といった使いにくさを感じていたので,StepFunctionsに組み込みを行いました。
Lambdaで処理を実行するのと同等のイメージでInput/Outputを取り扱えるようにしたいと思います。
Vpc
まずはVPCを設置します。
import * as cdk from 'aws-cdk-lib';
import { Construct } from 'constructs';
import * as ec2 from 'aws-cdk-lib/aws-ec2';


export class VpcStack extends cdk.Stack {
    public readonly vpc: ec2.Vpc;

    constructor(scope: Construct, id: string, props?: cdk.StackProps) {
        super(scope, id, props);

        // vpc
        this.vpc = new ec2.Vpc(this, 'Vpc', {
            ipAddresses: ec2.IpAddresses.cidr('10.0.0.0/16'),
            maxAzs: 1,
            natGateways: 0,
            subnetConfiguration: [
                {
                    name: 'PrivateSub',
                    subnetType: ec2.SubnetType.PRIVATE_WITH_EGRESS,
                },
                {
                    name: 'PublicSub',
                    subnetType: ec2.SubnetType.PUBLIC,
                }
            ]
        })

        // エンドポイントを追加する
        this.vpc.addGatewayEndpoint("s3-endpoint",
            { service: ec2.GatewayVpcEndpointAwsService.S3 }
        )
        this.vpc.addInterfaceEndpoint("ecr-endpoint", {
            service: ec2.InterfaceVpcEndpointAwsService.ECR
        })
        this.vpc.addInterfaceEndpoint("ecr-dkr-endpoint", {
            service: ec2.InterfaceVpcEndpointAwsService.ECR_DOCKER
        })
        this.vpc.addInterfaceEndpoint("logs-endpoint", {
            service: ec2.InterfaceVpcEndpointAwsService.CLOUDWATCH_LOGS
        })
        this.vpc.addInterfaceEndpoint("stepfunctions-endpoint", {
            service: ec2.InterfaceVpcEndpointAwsService.STEP_FUNCTIONS
        });
    }
}
public/privateのサブネットをそれぞれ一つずつ配置します。今回は基本的にリソースをprivateに置くことにします。
Fargateをprivateに置くとネットワーク外のリソースにアクセスすることができないため,以下のエンドポイントをアタッチします。(Interfaceエンドポイントは1個につき$0.014/1h(ap-northeast-1)の料金がかかります。)
- Gatewayエンドポイント
- S3
- Interfaceエンドポイント
- ecr-dkr-endpoint
- ecr-endpoint
- logs-endpoint
- stepfunctions-endpoint
StepFunctions + ECS
ECSの処理タスクを含むStateMachineを作成します。
import * as cdk from 'aws-cdk-lib';
import { Construct } from 'constructs';
import * as iam from 'aws-cdk-lib/aws-iam';
import * as ec2 from 'aws-cdk-lib/aws-ec2';
import * as ecs from 'aws-cdk-lib/aws-ecs';
import * as sfn from 'aws-cdk-lib/aws-stepfunctions';
import * as sfntasks from 'aws-cdk-lib/aws-stepfunctions-tasks';


type stepfunctionsProps = cdk.StackProps & {
    vpc: ec2.Vpc;
};
export class StepFunctionsStack extends cdk.Stack {
    constructor(scope: Construct, id: string, props: stepfunctionsProps) {
        super(scope, id, props);

        /**
         * ECSの設定
         */
        const cluster = new ecs.Cluster(this, "EcsCluster", {
            vpc: props.vpc,
        });

        const image = ecs.ContainerImage.fromAsset("./assets/ecs");

        const role = new iam.Role(this, "EcsRole", {
            assumedBy: new iam.ServicePrincipal('ecs-tasks.amazonaws.com')
        });
        role.addToPolicy(
            new iam.PolicyStatement({
                actions: [
                    "states:SendTaskSuccess",
                    "states:SendTaskFailure",
                ],
                resources: ['*'],
            })
        )

        const taskDefinition = new ecs.FargateTaskDefinition(this, "TaskDef", {
            taskRole: role,
            executionRole: role,
        });

        const container = taskDefinition.addContainer(id = "python-container", {
            containerName: "python-container",
            image: image,
            logging: new ecs.AwsLogDriver({ streamPrefix: 'EventEcs', mode: ecs.AwsLogDriverMode.NON_BLOCKING }),
        })

        /**
         * StepFunctionsの設定
         */
        const ecsRunTask = new sfntasks.EcsRunTask(this, "FargateTask", {
            integrationPattern: sfn.IntegrationPattern.RUN_JOB,
            cluster: cluster,
            taskDefinition: taskDefinition,
            launchTarget: new sfntasks.EcsFargateLaunchTarget(),
            propagatedTagSource: ecs.PropagatedTagSource.TASK_DEFINITION,
            containerOverrides: [
                {
                    containerDefinition: container,
                    environment: [
                        { name: 'INPUT', value: sfn.JsonPath.jsonToString(sfn.JsonPath.objectAt("$.input")) },
                        { name: 'TOKEN', value: sfn.JsonPath.stringAt("$$.Task.Token") },
                    ],
                }
            ],
        });

        const waitTask = new sfn.Wait(this, 'Wait', { time: sfn.WaitTime.duration(cdk.Duration.seconds(10)) });

        const choice = new sfn.Choice(this, 'Choice');

        const condition = sfn.Condition.numberGreaterThan('$.input.number', 3);

        const success = new sfn.Succeed(this, 'Succeed')

        const stateMachine = new sfn.StateMachine(this, "StateMachine", {
            definitionBody: sfn.DefinitionBody.fromChainable(
                choice.when(condition, success)
                    .otherwise(ecsRunTask.next(waitTask).next(choice))
            ),
        });
    }
}
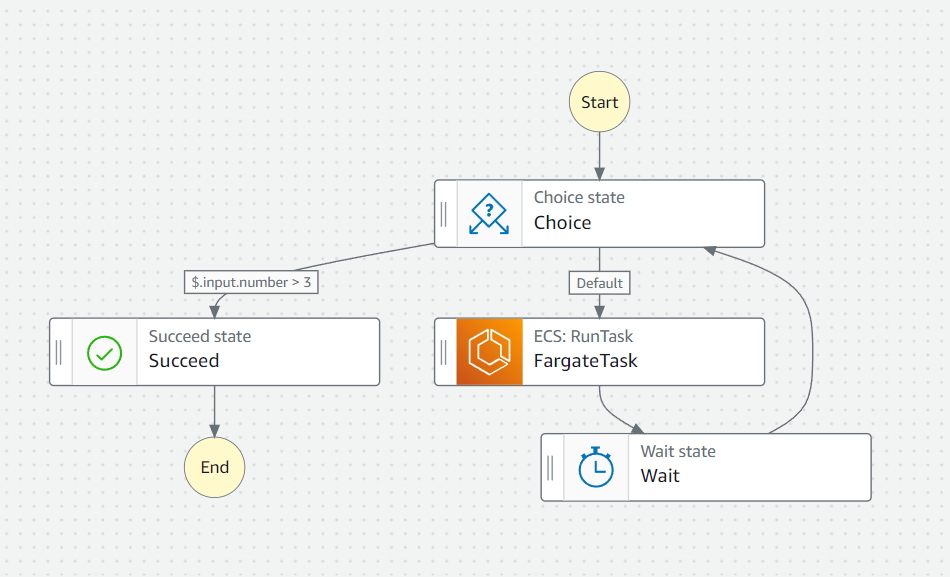
上記のcdkで以下のようなStateMachineが作成されます。

このStateMachineには入力に対する簡単な条件判定を組み込んでいます。以下のようなjsonをStateMachineに入力すると
{
  "input": {
    "number": 0
  }
}
$.input.numberの数値が読み取られて以下のように遷移します。
- 3以下だと: ECSタスクを実行 → 10秒停止 → 再度条件判定に戻る
- 3より大きいと:
Succeedとして正常終了する
従って$.input.number: 0 から処理を開始すると[0, 1, 2, 3]の計4回ECSタスクが実行されることになります。
コンテナ内部の処理
コンテナのイメージも自作のものを使いたいので,./assets/ecsに以下のようなDockerfileとapp.pyを作成しておきます。
FROM public.ecr.aws/docker/library/python:3.11

WORKDIR /workspace
COPY . .

# python library
RUN pip install -r requirements.txt

CMD ["python", "app.py"]
import os
import json
import boto3
import numpy as np

# stepfunctionとの連絡用
sfn = boto3.client("stepfunctions")

# 環境変数からパラメータを取得
token = os.environ["TOKEN"]
input_json = json.loads(os.environ["INPUT"])
n = input_json["number"]

try:
    # 処理
    arr = np.random.random(n)

    # 入力をインクリメント
    input_json["number"] += 1

    sfn.send_task_success(
        taskToken=token,
        output=json.dumps({"input": input_json, "result": arr.tolist()}),
    )
    print("Container task success.")

except Exception as e:
    sfn.send_task_failure(taskToken=token, error="Container task failed.")
    print("Container task failed.")
コンテナ内部では環境変数INPUTに埋め込まれた文字列から入力値を読み取り,sfn.send_task_success()またはsfn.send_task_failure()によって出力を文字列で返すようにしています。
(ここらが,Lambdaだと引数eventで入力を読めたりreturnで出力できたりしてとても楽なのですが)
1回目のECSの実行にはStateMachineに入力したjsonが与えられ,2回目以降の入力には直前のECSの出力が使われます。ここで,入力値をそのまま出力に回すと無限ループとなってしまうので,$.input.numberを1ずつ増分して返してやります。
数値の増分だけだと少し寂しいので,numpyでランダム行列を作成する処理を行い$.resultとして返します。本番だとここの処理をもっと複雑にするイメージです。
まとめ
ECS + StepFunctionsの基本的な使い方をまとめました。